Self-taught tintypes
As my historic technology project during my first year of graduate school at Buffalo State, I chose to recreate the tintype process using historic and contemporary literature sources to inform my materials and techniques.

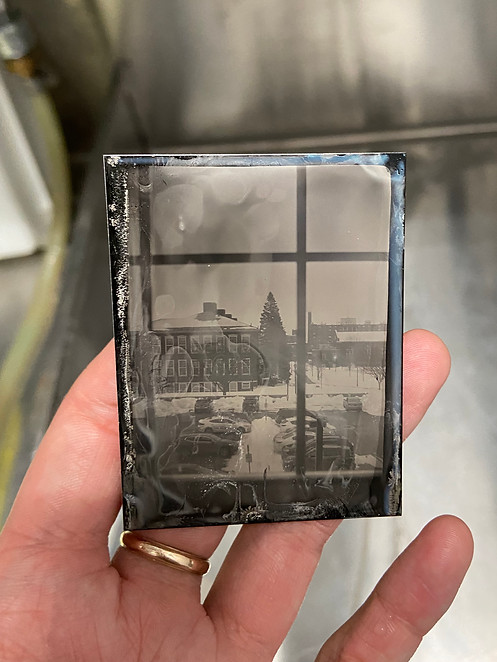
After many trials, the images above were the plates I was able to capture during my project.
If you'd like a very basic idea of the tintype chemical process, I came up with this elementary diagram outlining the methodology synthesized by Frederick Scott Archer in 1852.
It starts with a metal plate coated in nitrocellulose-based "salted" collodion. The "salt" in "salted" collodion are halide anions which join up with free silver cations once the coated plate takes a soak in a silver nitrate bath. The sticky collodion gives the new light sensitive silver halide a place to live, and must remain wet through the exposure process. Once the sensitive plate is exposed to ultra-violet light (like from the sun), the energy from the light selectively reduces the silver ions, leaving an exposure made up of pure atomic silver. An acidic solution of developer reveals this latent silver image, and a bath of "fixer" removes the unreacted silver halides and reveals the final direct positive image.
Pretty cool.
I began my exploration by sourcing the chemistry I would need to make this all happen. I purchased collodion for coating the plates, and lavender oil for the historic varnish from a photography supply company that stocks equipment for tintypists. The rest of the chemicals I was able to source from within the Buffalo State Conservation Department labs.
Next, needing an actual camera, I chose to modify a Kodak Brownie that had belonged to my grandfather. I cut an adapter out of copper to sit over the film holder and keep the small tintype plates in place. For the tintype plates themselves, I ordered a custom-cut size of lacquered aluminum sheet from a trophy engraving company.


Next, I needed a sensitizing tank for my plates to make them light sensitive after coating them with collodion. I picked up a glass candle holder from the thrift store, painted it black, and fabricated a lid from wood. I heat-bent a section of plexiglas to serve as a small hooked bracket into which I could slot the coated plates.


Along with some other solutions, I mixed up a historic varnish based on 19th century photography manuals. It was a mixture of gum sandarac, alcohol, and lavender oil. In this image I'm using a ball of cotton wool to filter impurities like bark and bugs from the dissolved gum sandarac.
Once I was ready to shoot, I conducted several tests in the imaging studio using the tungsten lights. The UV content of the lights proved to be too low, and I turned instead to sunlit subjects. I headed into the department lounge to aim my modified Brownie out the window. When it came time to develop the image, I brought some classmates into the dark room for moral support.


It worked!
Once I had coated, sensitized, exposed, and developed a handful of plates, I noticed that the exposures were getting darker and darker, and needing more open-shutter time to get the right amount of light.
I'd seen a phrase in many of the old Victorian-era manuals about this problem, regarding how to fix it. They all said to "sun your silver" by placing your silver nitrate solution in a clear container and exposing it to sunlight for a few hours. I was hesitant to try it, but the manuals insisted it was the only was to "rid my solution of evils."
The image on the right (seen below in the mobile version of this website), to my utter shock and slight horror, was the result. The evils!

However much I wanted to believe-- as a Victorian would-- that these black ribbons were the solidification of malevolent spirits, thwarted from interfering with my scientific process, I have Google. Google told me that these "evils" are actually bits of organic material in the silver bath that can contaminate it. Once exposed to sunlight, the organic bits react with free silver ions and sink to the bottom of the solution so they can be filtered out, thus purifying the silver bath once more.
Here are those final tintypes again, because they were certainly a labor of love. Thank you to my classmate models who had to hold these poses for the full 2 minute exposures:


